A step-by-step video guide to giving a great spraygun tan
Here, we provide step by step instructions, with videos included, for those who are unfamiliar and unexperienced with using a spray gun for airbrush tanning. Keep in mind that these videos are just guidance for learning techniques, the best methods are individually found through practice and experience and should be comfortable to both the technician and the customer. You may find the procedures shown here are only partially applicable to your sucess with a tanning session, but we encourage attentive studying of these guides, as well as others, for confident spray tanning skills.
Procedure Preparation
At a bare minimum, a tanning setup calls for a large towel for the client to stand on and the spraying session should be done in a room meeting ventilation requirements. Ideally, the client should have previously exfoliated and applied any barrier/blending cream to their palms, and other rough skin areas. Preparation, as well as aftercare maintanance, are often overlooked, important steps to the overall tanning result and we recommend reading and relaying to your clients the information written in our Exfoliation and Moisturization page.
Fan Pattern Adjustment
The direction of a fan pattern is indicated and guided by the "prongs" on the air cap at the tip of the spray gun. Horizonal alignment sprays a vertical spray pattern while a vertical alignment sprays a horizontal spray pattern. There are two spray strokes demonstrated in these videos, which are indicated by a graphic beside that specific direction. The basic rule of thumb is to point the prongs in the direction you are moving the spray gun/spray pattern.

Turn cap horizontal for a vertical spray pattern, use when moving gun left or right. Marked "V" in below instructions.

Turn cap vertical for a horizontal spray pattern, use when moving gun up or down. Marked "H" in below instructions.
Spray Gun Tanning Video Guide
Front Torso
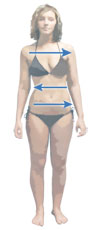
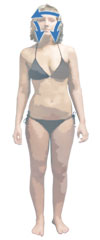
- (v) Have the client stand naturally with arms to the sides as shown in the picture. Using horizontal strokes, spray the abdomen starting from the swimsuit bottom and ending at the bottom of the swimsuit top. Slightly overlap these strokes to ensure complete coverage.
- (v) If a top is present, fill in the clevage area with a "U" shaped spray stroke. Continue horizontal strokes, slightly overlapping them while moving up to the the tops of the shoulders and beneath the base of the neck.
- (h) Cross Hatch Pattern: If spraying a second front torso coat, consider using vertical strokes instead of horizontal. Utilizing a cross hatch pattern can better prevent missed spots.
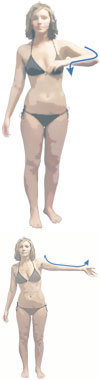
Sides

- (h) Have the client raise their arm to allow access to their side. One spray stroke should be sufficient to cover the side.
- Have the client turn around and repeat this step for the other side.
- (h) Alternate Procedure Note: It is also possible to spray the underside of the arm while the client is in this position.
Back Torso
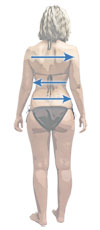
- Have the client stand naturally with arms to the sides. Using slightly overlapping horizontal strokes, spray the back starting from the swimsuit bottom up to the tops of the shoulders.
- Have the client hold up their hair draping over the back of the neck if a hair cover or ponytail holder is not being used. Use a short stroke from each side to cover the back of the neck.
- Cross Hatch Pattern: The video demonstrates a second coat being sprayed using vertical strokes until the entire back is covered. Again, this better prevents missed spots.
- If the client has dangling strings from the swimsuit, such as our model shown, lift the strings and spray lightly over the pale "shadows" left behind when spraying the torso. (This is not shown in the video.)
Arms & Hands
- (h) Have the client raise their arm vertically to expose the underside of the arm. Use one or two spray strokes along the length of the arm, pulling away at the wrist while releasing the trigger.
- (h) Have the client lower their arm diagonally downward and hold their fingers in a claw-like position to stretch out the creases in the knuckles. Using 1 to 2 srokes, spray the top side of the arm down to the wrist. Come back with a light stroke for the hand as hands tend to exhibit excessive absorption of tanning solution.
- (h) Have the client bend their arm with their thumb towards their chest to expose and flex the skin of the elbow. Use one spray stroke to cover the elbow.
- Repeat these steps for the other arm.
Legs
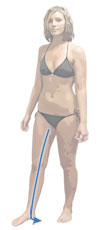
- • Have the client step slightly forward and turn their inner ankle outward to expose the inside of the leg. Spray the inside leg with vertical spray strokes.
- Have the client stand naturally. Spray the front of the leg.
- Move around to face the side of the leg and spray down the length of the leg until it is covered.
- Have the client stand naturally and move around to face the back of the leg. Spray down the length of the leg until it is covered. If necessary, the client may need to bend slightly forward to stretch any creases where the leg meets the buttocks.
- Spray the knee cap area lightly. The knee might have "dimples" or crease lines where spray solution may not penetrate. It is suggested to have a box or prop for the client to rest their foot to stretch out these lines while spraying.
- Repeat these steps for the opposite legs.
Feet

- (v) Spray one light horizontal stroke on each side of the foot.
- (h) Finish the feet with a light vertical stroke across the top of each foot.
Face
- (h) Have the client hold their breath and close their eyes to attempt not to inhale solution. Spray across the face with an upward-angling, horizontal stroke beginning at the chin and ending at front of the ear. Repeat this for the opposite side of the face. Have the client breathe normally for a few seconds, and again ask them to hold their breath. Finish with an arching horizontal stroke across the forhead, barely feathering the stroke edge into the hairline. It is suggested to have a predetermined signal to use if the client becomes uneasy or uncomfortable while being sprayed
During the entire time of the tanning session, always remember to keep the comfort of the client your highest priority. Remind them of the importance of moisturization and maintenance to the life of their tan, and possibly offer a choice of post-sunless products already stocked at your tanning location. Keep in mind that experience, practice and overall knowledge of sunless tanning all contribute to your success as a tanning technician.